Table of Contents
How to Use the Server Creator Panel for Minecraft Hosting
Discover how to navigate and master the server creator panel — the backbone of our Minecraft server hosting platform — and set up your server step-by-step.

Introduction: Your Mission Control
Welcome to your new command center! The server creator panel is the heart of your hosting experience, meticulously engineered to be both incredibly powerful and remarkably intuitive. We believe that managing a Minecraft server shouldn't require a degree in computer science. Whether you're a parent setting up a safe world for your kids, a gamer launching a server for friends, or a seasoned administrator cultivating a massive online community, this panel is your key to success. Our philosophy is simple: put powerful tools in your hands and make them easy to use, so you can spend less time troubleshooting and more time playing. This guide will be your trusted companion, walking you through every feature, from initial setup to advanced customization.
Step 1: The 5-Minute Server Launch
Our primary goal is to get you from signup to gameplay in under five minutes. The initial setup is streamlined into a few critical decisions that define the foundation of your server.
Choosing Your Game Version: Java vs. Bedrock
The first choice is the most fundamental: Java or Bedrock? Minecraft Java server hosting is the original PC version, known for its massive modding community and deep technical customization. Bedrock Edition is the cross-platform version that unites players on consoles, mobile, and Windows 10/11. Your choice will depend on your player base. Don't worry if you're unsure; our panel allows you to switch versions later on.
Selecting a Global Location
Ping is king. To ensure a-smooth, lag-free experience, you must choose a data center location that is geographically closest to the majority of your players. A player in London connecting to a server in London will have a much better time than connecting to one in Sydney. Our panel presents a clear list of global locations, allowing you to strategically place your server on the world map for optimal performance.
Picking Your Perfect Plan
Scalability is key. We offer a range of plans, from affordable Minecraft server hosting perfect for a handful of friends to powerhouse dedicated Minecraft server hosting designed for hundreds of players and complex modpacks. Review the RAM and CPU specifications for each. As your community grows, you can seamlessly upgrade your plan with a single click in the panel, ensuring your server always has the resources it needs.
Step 2: Mastering Basic Server Management
With your server created, you'll be greeted by the main dashboard. This is where you'll conduct day-to-day operations.
Core Controls: Start, Stop, Restart
These three buttons are your most-used tools. 'Start' brings your server online. 'Stop' performs a graceful shutdown, saving all world data before turning off. 'Restart' conveniently performs a stop and then a start, perfect for applying configuration changes or refreshing the server's memory.
The Live Server Console
The console is the live feed of your server's brain. Here, you'll see players joining and leaving, chat messages, and crucial error messages from plugins or mods. You can also execute commands directly, such as /op [playername] to grant someone admin privileges or /whitelist add [playername] to allow a new friend to join.
Player & World Management
The panel provides dedicated interfaces for managing your players and world. You can easily view who's online, issue bans, or manage your whitelist without typing commands. In the world management section, you can switch between different worlds, upload a world you've been building in single-player, or reset your current world to generate a fresh new landscape.
Step 3: Unleashing Your Creativity with Advanced Configuration
Now for the fun part: making the server truly yours. Our server creator panel simplifies even the most advanced customizations.
One-Click Mods & Plugins Installation
This is where our platform truly shines. Forget complicated manual uploads. Navigate to the 'Mods/Plugins' section, where you'll find a vast library of popular addons for platforms like Forge (for mods) and Spigot/Paper (for plugins). Simply find what you want and click 'Install.' The panel handles the rest. For custom or premium plugins, the file manager is always available.
File Manager & FTP Deep Dive
For ultimate control, you have full access to your server's file structure via a web-based file manager and traditional FTP. This allows you to edit configuration files directly. A key file is server.properties, where you can change your server's name (MOTD), set the maximum player count, adjust the difficulty, and much more. The plugins folder is where you can manage plugin-specific configurations.
Scheduled Tasks & Automated Backups
A smart admin automates. The 'Scheduled Tasks' feature lets you set up automatic restarts (e.g., every 12 hours to clear memory), broadcast messages, or run commands. Most importantly, you can schedule regular backups. Your world is precious; protect it from corruption or griefing by creating automatic backups. You can download these backups for off-site storage or restore them directly from the panel with a single click.
Step 4: Troubleshooting Like a Pro
Even the best servers run into issues. The panel provides the tools to diagnose and fix them quickly.
Using the Console for Diagnosis
If your server won't start, the console is the first place to look. It will almost always provide a specific error message. Often, this is due to a misconfigured or broken plugin. The error will typically name the problematic addon, allowing you to disable or reconfigure it.
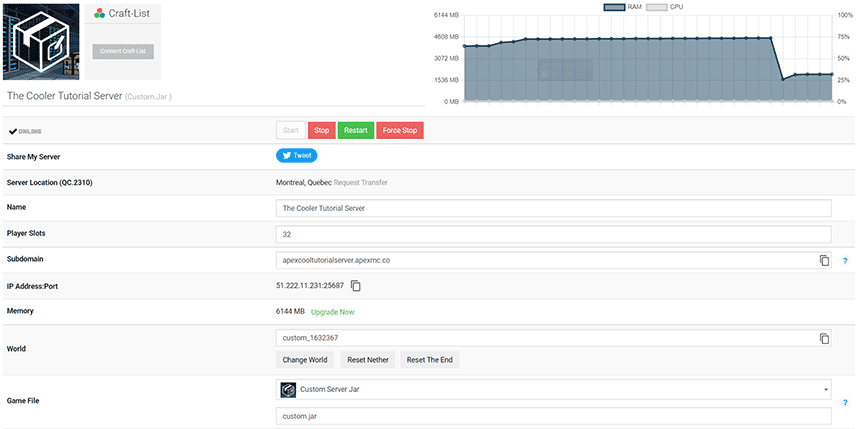
Monitoring Resource Usage
Is your server lagging? Check the resource monitor in the panel. You can see real-time graphs of your CPU and RAM usage. If your RAM is constantly maxed out, it's a clear sign you need more of it. If CPU usage spikes when many players are online, it might be time to consider an upgrade to a plan with more processing power.
Conclusion: You Are in Control
The server creator panel is more than just a tool; it's a gateway to endless creativity. By demystifying the complexities of Minecraft server hosting, we empower you to build, manage, and grow your perfect Minecraft world. From launching your first server to managing a complex, modded community, every feature is designed to be at your fingertips. Now, go explore, experiment, and bring your vision to life!